


On the forums and across our little community of Skirmishers, we see many requests for list critiques and discussions of individual units. What we rarely see, however, is a full-on theoretical discussion of the strategy and tactics inherent in the formulation of lists and the choices of what units you bring to the table. My goal today is to give a primer on my method of planning for tournaments and creating lists and to impart some ideas on how to evaluate a list and plan for victory.
First, some definitions. Many people reading this are probably aware of the distinction between strategy and tactics. Less known, however, is the intermediate level of operations. Here are the definitions I will be using today:
Strategy is the overall plan for victory in a war. Strategic planning is the art of figuring out what you want and the best way to get it. In Imperial Assault, strategy comes into play when building a list and figuring out what tasks you want it to accomplish.
Operations is the art of a campaign. Once you have a strategy planned, operational planning is evaluating the theater in which you will fight. In IA, operational planning is evaluating the rotation of maps and coming up with a plan for each scenario with your specific list.
Tactics is the art of winning an individual battle. Once you have a strategic goal in mind and an operation planned to achieve it, it is the tactics you use on the field that determine your success or failure. In this analysis, tactical planning is what happens when you set your pieces on the table and play the game, reacting to your opponent’s moves and the vagaries of the dice.
I will expand on these topics and use my Bantha Poodo list as an example of my planning at each level. I make no claims to greathood: I’ve Top 8ed my local Regionals and got to Top 16 at Worlds. I’m just looking to translate my knowledge of military affairs and military history to my favorite game, and elucidate my method of listbuilding and planning in the hope that someone finds it useful.
Strategic Planning: What Do You Want to Accomplish?

The first step to playing in Skirmish is making a squad. In order do so, you must establish how you want to win. In the race to 40 points, you can go for objectives, go for kills, or abstain and try to win on time. Different units are good at different strategies, so it is important to figure out what route you wish to take.
This step gets more interesting when one realizes it is nearly impossible to focus on one strategy: no current scenarios allow one to feasibly gain 40 points from objectives alone, total annihilation of an enemy list is nearly impossible within the allotted 60 minutes, and one has to score more points than their opponent while protecting their units in order to win on time. Therefore, any successful list needs to have a balance of strategies. It is still important to choose an emphasis, however, as a list that is equally good at all the paths will generally get wrecked by a more focused list.
Once you’ve picked your strategic path, it is time to pick your units. I could, and may in the future, write a whole article on squad roles and the units that fill them. For now though, we’ll stick with the basic classifications: Fighters, Grabbers, and Support.
Fighters play the killing game. Their best use is attacking enemy units to gain their figure points. The hallmarks of a Fighter unit are a combination of any 2 of good dice pool, good surges, and survivability. Prominent pure Fighters include Alliance Rangers, HK Assassin Droids, and Heavy Stormtroopers.
Grabbers play the objective game. They excel at grabbing and controlling objectives and terminals but have weak attacks. A good Grabber has a high speed and a low cost. Pure Grabbers include Alliance Smuggler and Hired Gun.
Supports assist other units. Many give beneficial conditions, movement points, or grant extra attacks. Prominent pure support characters include Gideon Argus and Jabba the Hutt.
Almost all units serve some combination of the above three roles, which means it is possible to craft a list focused on one path to victory that is still capable of following the other paths as needed. I’ll be covering what the intersections of different roles mean to your list in a future article.
 In Bantha Poodoo, I chose to follow my aggressive play style and try for a list capable of killing things as fast as possible. This means relying mostly on Fighters. The centerpiece units, my Banthas, are some of the best Fighters in the game. They are capable of dealing a lot of unmitigated damage to a lot of units, and they have access to powerful command cards that add to this power: Crush, Jundland Terror, Grisly Contest, and Ferocity. Additionally, with Beast Tamer and their native speed of 5, the Bantha are completely capable of running objectives while their massive stature and 21 health make them capable of holding objectives as well as blocking line of sight, making the Bantha a decent Grabber at need. The inclusion of eWeequay and eGamorreans also follow this philosophy: these guys are capable of dealing massive damage as Fighters, especially when given focus tokens by my Supports, Gideon and C3PO. The eGamorreans as well are good Grabbers, with their high health and great defense bonus against Ranged attacks.
Operational Planning: Know Your Battlefield

So you have a plan, and you have a list built to accomplish that plan. Excellent! Now for our next task: planning for battle. The biggest advantage we have as wargamers over actual warfighters is that we have perfect knowledge of the field of battle ahead of time. With even just a little analysis and forethought, you can gain the upper hand early against unprepared opponents. To this end, I’ve found Ibrahim Shaath’s PDF Skirmish Maps to be incomparably valuable, as you can view objective and terminal locations, review mission rules, and count spaces from one lovingly detailed file on your phone or computer.
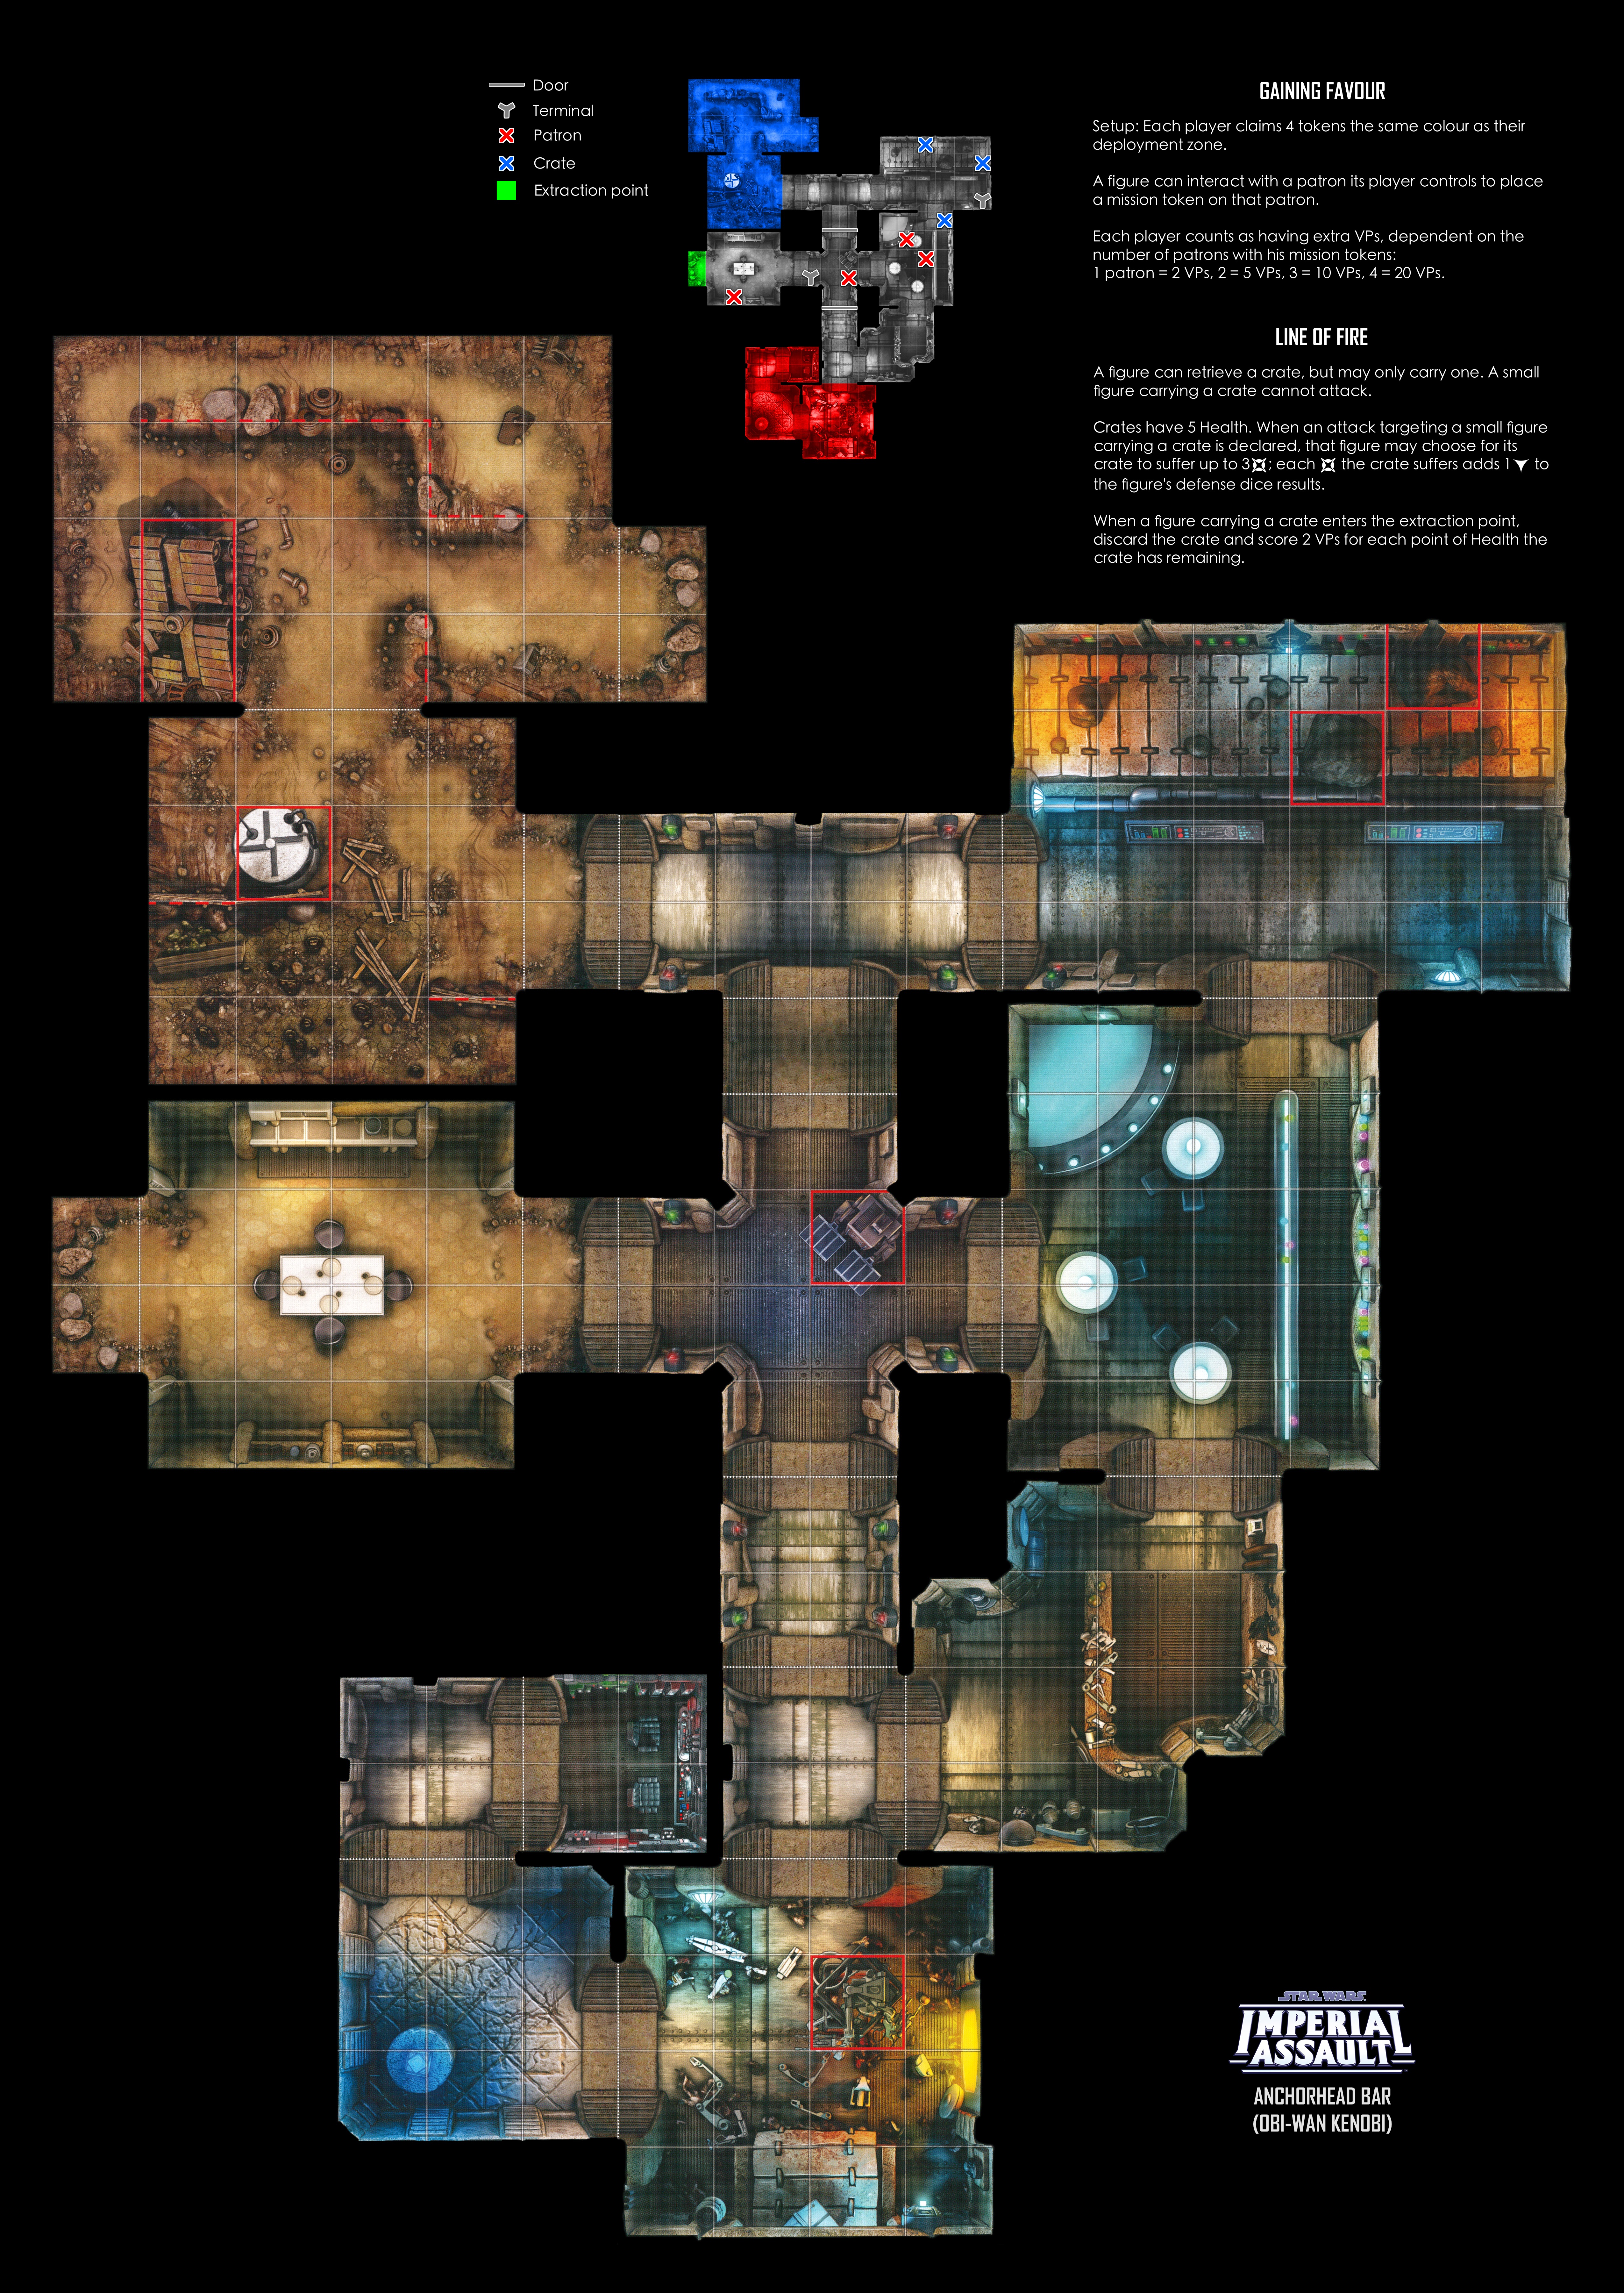
The general idea in this analysis is to look at the deployment zones and try to judge where the contours of the battlefield guide each player. I’m not going to go through a map by map analysis today. That could be a whole series of articles all by itself. Instead, I will choose one current rotation map (Anchorhead Cantina) and examine its deployment zones as compared to its objective placements, and how I can leverage that knowledge to my advantage.
In general, the Blue (top) zone is a sheltered, secure place to deploy from. From it, you can send your Fighters in to contest the terminal hallway and its Patrons without risking your Supports to enemy fire, and you have a commanding view of the Valuable Goods in the conveyor room. In contrast, units from the Red (bottom) are able to quickly and easily move to cover and control the Cantina as well as contest the terminal hallway, at the cost of access to the Valuable Goods and the temptation (and sometimes need) to split your forces between the Cantina and the Hallway.
 In our example, Bantha Poodoo will be playing from the blue deployment zone on the A-Side mission of the Cantina, Gaining Favor. Obviously, the goal here is to kill enough enemy figures and/or keep them away long enough to claim all the patrons. From the Blue deployment zone, Bantha Poodoo wants to control the terminal hallway. The reason for this is simple: it is impossible to move into the Cantina proper and still be able to attack during the first round or in the beginning of the second. The one exception, a Beast Tamer’d Bantha, would be too exposed to the enemy, who can move and attack into the Cantina round one, and die a miserable, lonely death. On round 2, Poodoo moves in force into the terminal hallway, killing opposing units that moved in to contest the area using the first Bantha to crash into enemy lines and do as much damage as possible while the second screens fire from the Cantina and deals damage to any units there. EGamorreans move into the fray next, hacking at enemies and favoring patrons. Finally, the eWeequay, focused by Gideon and 3PO, snipe at enemies from the rear lines to deal as much damage as possible. Units from the Red zone will probably be split as they send some of their forces to contest the terminal with you and perhaps Favor Patrons and some into the Cantina. We want to ruthlessly annihilate those forces in the hallway, then pivot to kill the remaining forces in the Cantina.
This plan, of course, assumes that you are fighting a cooperative opponent. What are you supposed to do if the enemy does something unexpected? What if your dice fail you? What if you don’t draw the cards you need? Now, it is time to adapt to your tactical situation.
Tactical Planning: Fighting the Good Fight

“No battle plan survives contact with the enemy” – Prussian General Helmuth von Moltke
We can formulate a general strategy and a perfect list to achieve that strategy. We can plan operations and come up with the perfect game plans and opening moves for every scenario. However, Imperial Assault is won on the board where dice roll, command cards are drawn, and opponents do not do exactly what we want or expect them to do. This is where Tactics enters the fray.
Unfortunately, I am not such a master of the game that I can give you advice on every single possible situation with every single list. Instead, I will leave you with a few maxims that have served me well in my Imperial Assault career:
Keep Your Eyes on the Prize: You are here to win (I assume). That means you want to be shooting for 40 VP at all times. Many players can find themselves distracted going after secondary objectives: take the terminal! Contest one objective to keep it from your enemy when there’s an objective you could take for yourself! Do this totally sweet combo that can kill an unimportant figure in one shot! All of these and more can be compelling choices. When contemplating a course of action, always ask yourself: “How does this help me win the game?” If the answer is, “It doesn’t really” or “Not as much as this other thing I could do”, then move along to a new idea.
Follow Through: In many games, either myself or my opponent fall into a trap of doing some damage to a figure, then not following up and finishing that unit off. That figure can then run off to the back lines to complete objectives and deny points to the enemy. It is essential to concentrate your fire, when possible, to wipe figures (and preferably whole activations) off the board. This reduces your opponent’s damage output and overall objective play, and reduces their tactical options.
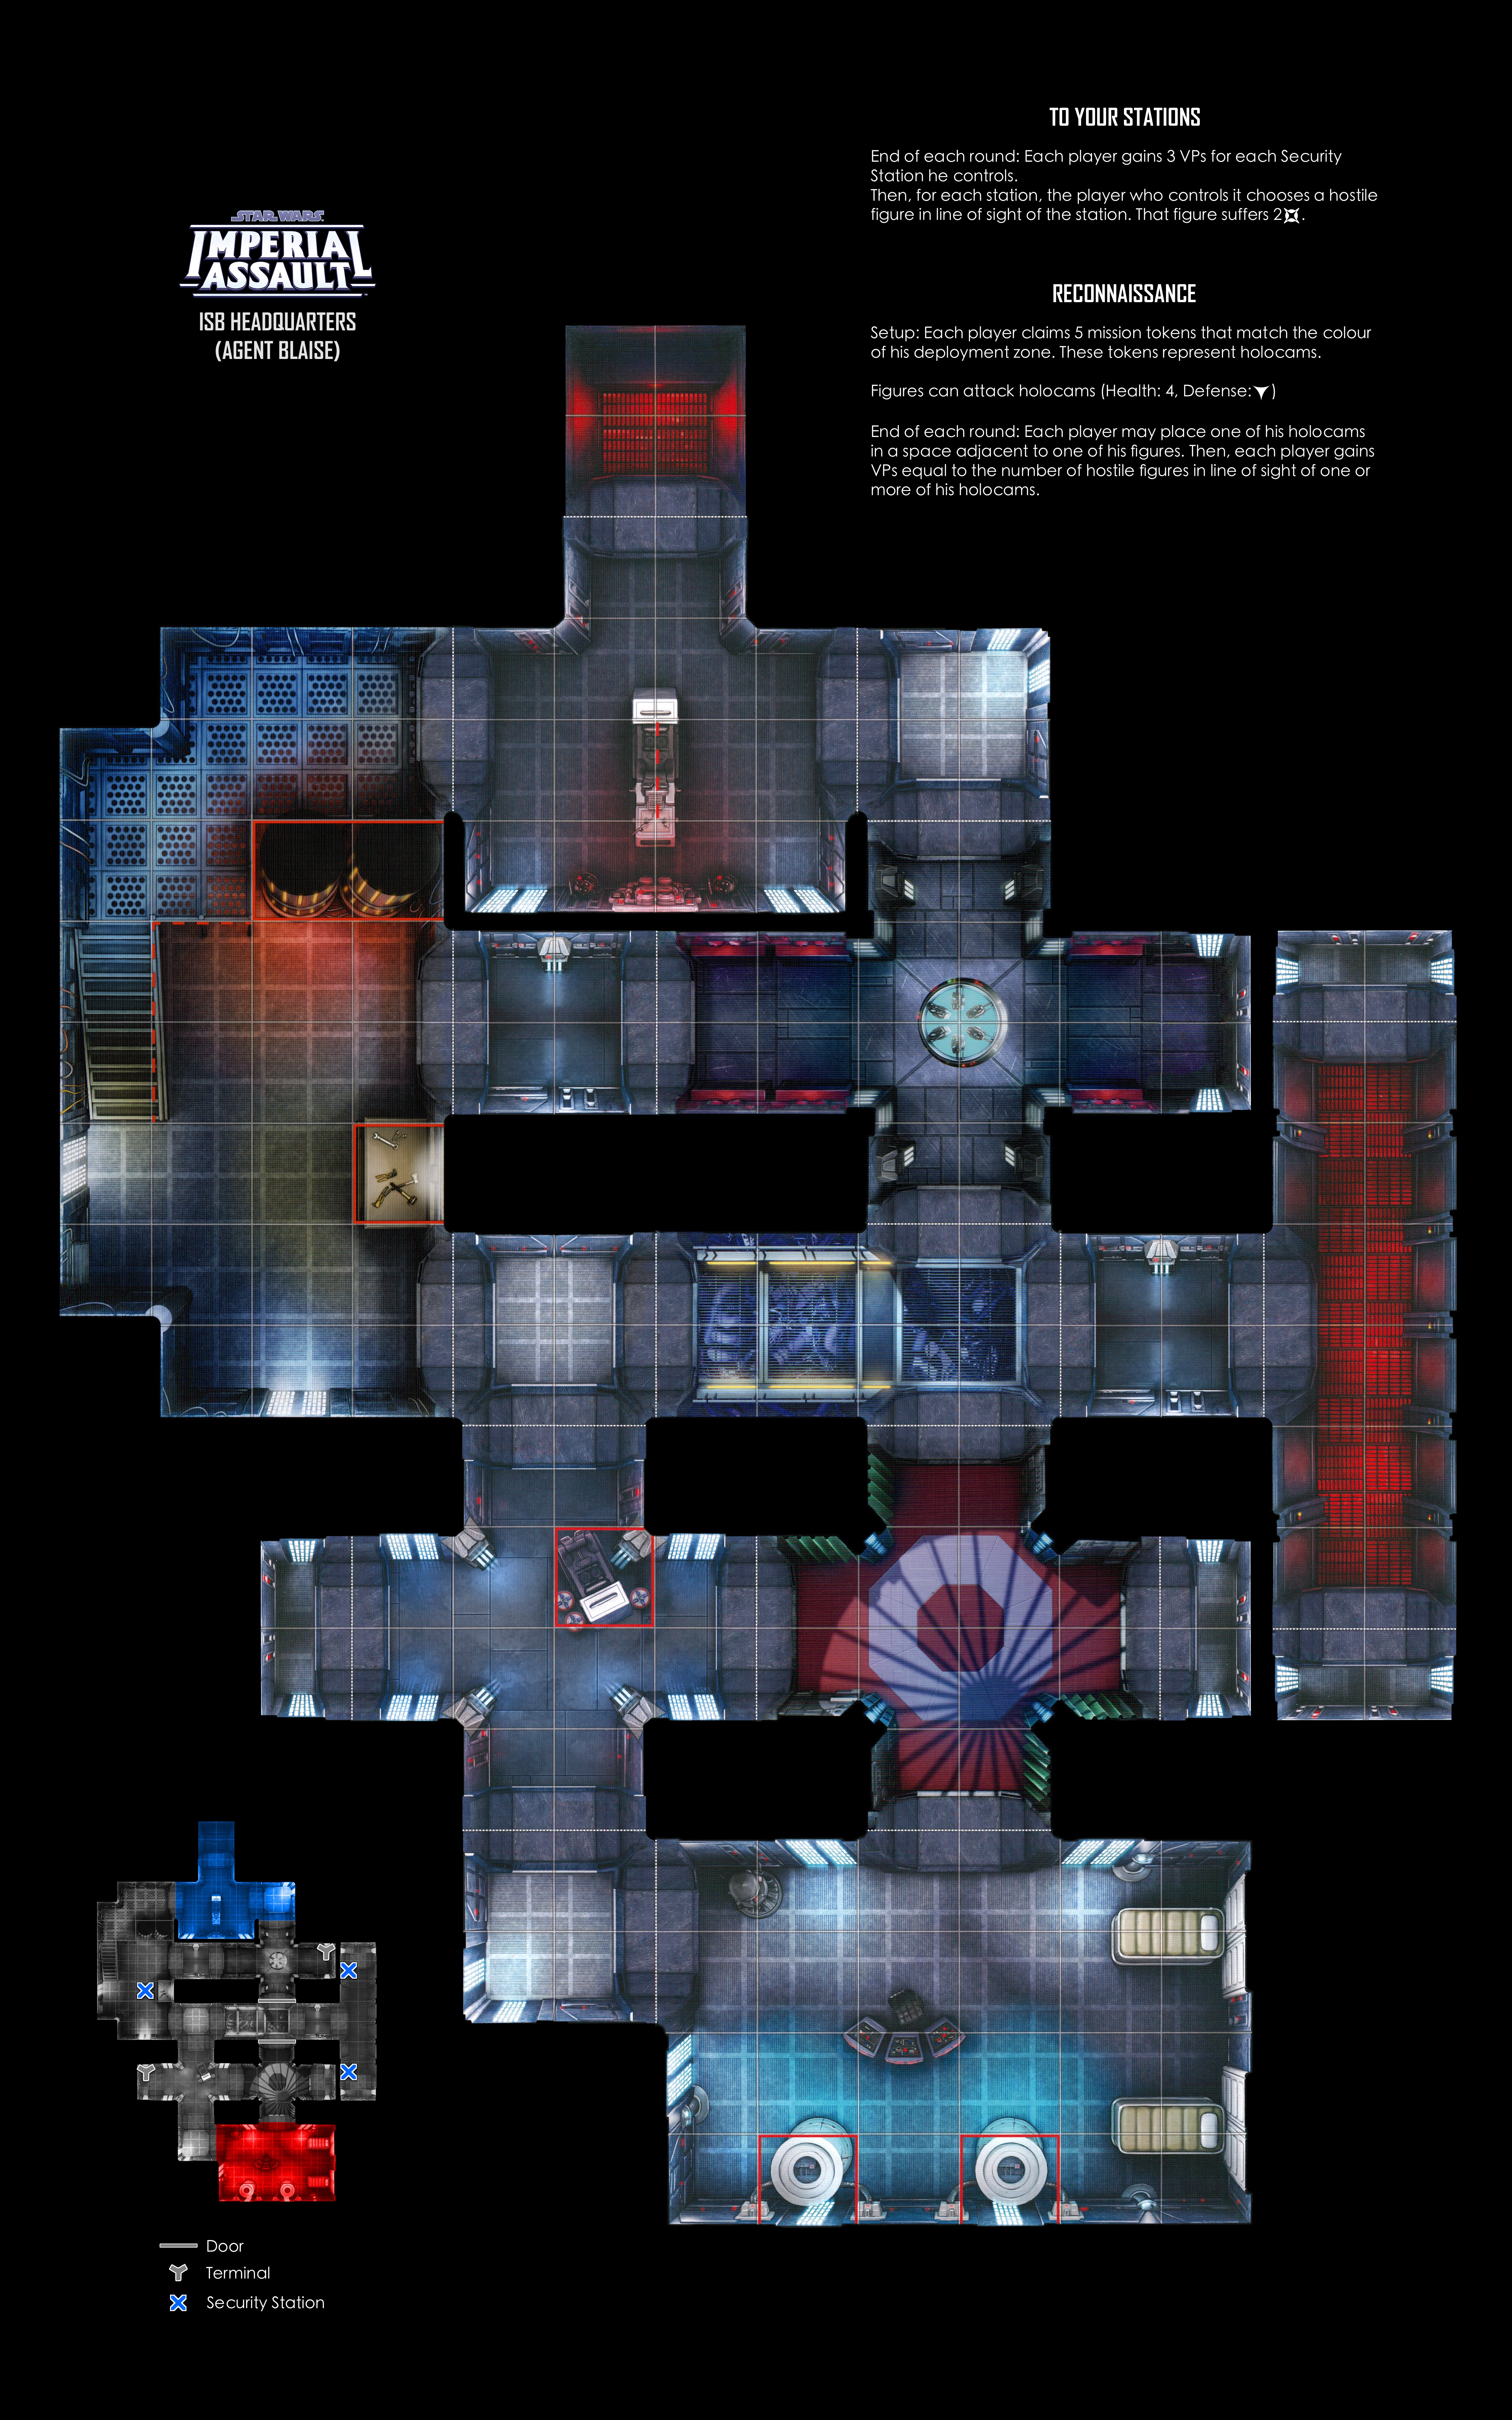
Divide and Conquer: Many players, especially on the ISB Headquarters map, tend to split up their forces to try to contest multiple objectives at the same time. You can use this tendency to your advantage: send your entire squad as a unit into what you intend to be the main combat zone. This way, you will have “local superiority” in your combat zone and be able to wither away enemy figures under a weight of fire they cannot return. Many of the games I win are won through this tactic, and many of the games I end up losing are the ones where I decide it is okay to split off a significant portion of my forces to get an objective or go fight against an opponent’s split.
Remain Calm: The final tactical advice I have to give is not on the battle on the board, but the battle in your mind. Some games, it just seems like the world is out to get you: your dice have been terrible, or you have not drawn the cards you need, or perhaps you’ve made a mistake that cost you an important figure. If you let these things get to you, you run the risk of going “on tilt”. When put on tilt, you make increasingly bad decisions that can cost you the match and more importantly prevent you from having any fun for the rest of the day. Coming off of tilt is more easily said than done. I usually take a walk between rounds and/or take deep breaths if I feel on tilt, but everyone has different anger management techniques.
Go Forth and Conquer
You’ve just read how to use strategic, operational, and tactical planning to your benefit in the Imperial Assault Skirmish game. I hope that these metrics prove as useful to you as they have to me in my Imperial Assault career.
During this analysis, I touched on several topics that deserve to be further explored on their own. In the future, I will be conducting that exploration, starting with the classifications of units and how that can affect listmaking.
Did you find my analysis helpful? Did I miss any obvious points? Am I just crazy? Let me know in the comments! I would love to consider any angles I may have missed.
This is a fantastic article thanks Jake. I think probably the best Imperial Assault article I’ve read (and there’s been a few good ones)
I think the Operational section in particular is one that players don’t pay enough attention to in my opinion.
Yes it might be sad to sit there and work out where each of your units should be deployed to make sure that you can contest an objective, or swing at the Dianoga etc. however doing so will give you a considerable advantage against the other player who realises he’s 1 short of opening a door, or has to burn fleet footed to get to a terminal etc.
Thanks for this, and I look forward to further guest articles from you!
Excellent article, knowing your battlefield is high on my priorities when prepping since knowing the potential objectives, deployment zones and what my squad can potentially accomplish. Great stuff, look forward to more articles like this.